bacon-wrapped turkey roulade
 This is my first post in… how long? Over a year?! In any case, I’ve been meaning to post this recipe ever since I first made it for last year’s Thanksgiving (and maybe the one before that, now that I think about it… wow, I am behind!). If you’re like us and don’t really need enough turkey to feed 15, but enough to feed two plus some leftovers and one very-hungry-sitting-ever-so-nicely-with-pleading-eyes-oh-why-can’t-I-have-some puppy, this is the Thanksgiving turkey for you!
This was inspired by a recipe for turkey porchetta over at Serious Eats. My version is more of a strict roulade and less porchetta-esque, involving two turkey breasts, sliced and pounded out, a layer of fresh herbs, and a protective layer of bacon on the outside. It’s a fussy recipe but by no means as difficult as it looks.
Ingredients:
- two turkey breasts (you could also go with one and just reduce the amount of herbs and bacon accordingly)
- a handful of thyme, sage, and rosemary or any other combination of fresh herbs that suits you, finely minced
- around a half pound of bacon, thinly sliced
- kosher salt and pepper
Steps:
- Preheat the oven to 375 degrees fahrenheit.
- If your turkey is on the bone, debone it.
- Butterfly it and pound it out to about a 1/2 inch thickness. Don’t worry if it has some holes in it, turkey is rather sticky and it’ll still hold together.
- Liberally salt and pepper the flattened turkey pieces.
- Spread the minced herbs on the turkey.
- Roll the turkey pieces up into a football shape.
- Wrap it in the bacon slices.
- Tie the turkey football up with twine, in about 1-inch intervals. It will be a bit hard to do this with one piece of twine, so you can add on as you go along. And don’t worry about making it beautiful or even just yet; you can tuck the bacon strips under the twine once it’s all together. I like to wrap the string around the length of the turkey to hold the whole thing together (see the picture).

- In a cast-iron skillet, brown the turkey roulade on all sides, including the ends. Don’t overbrown it because it’s going to continue to brown in the oven.
- Once browned, pop the turkey in the oven (still in the cast-iron skillet) and bake for 30 minutes, flipping the bird every 5-8 minutes or so to get an even brown crust on the bacon.
- After 30 minutes, turn the oven down to 275 and cook for another hour, or until the turkey registers an internal heat of 150 degrees.
- Remove from the oven and let it rest for about 5-10 minutes, then snip the twine off.
- Slice into 1/2 to 3/4 inch slices and serve.

taco salad with grilled chicken
 We already have the kind of weather here in Chicago when nothing but salads and lighter fare will do. It’s been muggy and disgustingly hot for the past couple of days. As a result, D. and I have decided that we are on the “salad regimen” from this point onward, both because I can’t imagine eating anything heavier and because it’s been a long, LONG winter during which I spent most of my time sitting at a desk and binging on comfort food in my “spare” time. It’s time to trim down and get back into my embarrassingly tight summer clothes from last year.
This salad was inspired by a fairly boring salad I had the other day. I have a habit of ordering something in a restaurant and then immediately deciding I can make it better at home. D. and I went to a local pub for dinner and beers and a short bout of writing. The “Santa Fe salad” that I ordered was a take on taco salad, a romaine concoction with grilled chicken, peppers, avocado, corn chip pieces, and a fairly bland avocado ranch dressing. One bite in and I had already decided that I could improve on it. I did some googling, and came across a number of recipes for taco salad… including ground beef, crushed nacho chips and an unnecessary amount of sour cream. In case you think I’m exaggerating, see the Queen of Clogged Arteries’ 5-star recipe for taco salad, which includes iceberg lettuce, ground beef, taco-flavored chips AND tortilla chips AND a cup of Catalina dressing. No help there.
On that note, does anyone else find salad recipes kind of pointless? Basically, I just read them for the dressing recipe and for interesting ideas about which greens/vegetables/meats/nuts/cheeses to pair together. I don’t bother precisely measuring the ingredients when I make a salad, I just eyeball everything based on whether or not it’s a meal salad or a side dish.
As a result, I’m not posting a recipe per se, I just want to tell you about what I put in this delicious salad and what went into the dressing. The nice thing about it is that it is super versatile. You could easily use sautéed shrimp instead of chicken, or just increase the black beans quotient to make it vegetarian. I have a moral objection to ground beef in a salad, and will not, on principle, offer it as a suggestion.
Altogether, this produced two meal-sized salads for tonight and two salads for lunch tomorrow. It’s a hearty salad, satisfying in all the right ways. The “salad regimen” isn’t about leafy, wilting salads but about chunky, filling salads that don’t skimp on vitamins.
I’m going to assume you know how to assemble a salad, and therefore won’t insult your intelligence with instructions.
taco salad with grilled chicken
… in which I included:
- One bag of pre-chopped romaine lettuce (a head of lettuce, washed, dried and chopped would also do)
- Half a yellow pepper and half a red pepper, diced
- about 1/8 of a red onion, diced
- 1 small package of cherry tomatoes, sliced in half
- 1/2 cup of roughly chopped cilantro
- 1 can of black beans, rinsed and drained
- 2 avocados, chopped into cubes
- 2 grilled cobs of corn (I pre-boiled them, slathered them in olive oil and sprinkled salt on them, then threw them on the grill)
- pepper jack, grated on top (cheddar or even goat cheese would work here)
- 5 corn tortillas, which I sliced into strips and deep-fried (you could also fry them in oil in a pan) until they became crispy
- 3 chicken breasts, which I sprinkled liberally with salt and pepper and marinated in 1/4 of the dressing (see below) for one hour before grilling it on our “Smoky Joe” Weber grill
lime, cilantro and cumin salad dressing
- zest of one lime, grated on a microplane grater
- one clove of garlic, grated on a microplane grater
- juice of one lime (I ended up using 1.5 limes because my first lime was kind of dry)
- 2 tablespoons of white vinegar
- 1 tablespoon of white sugar
- a generous squeeze of honey (I find it helps to hold oil and vinegar dressings together)
- 1 tsp of cumin
- about 1/2 cup of olive oil
- a handful of fresh cilantro, minced
- salt, to taste
Whisk it all together, toss the salad with it. You know the drill!
homemade pizza

Hawaiian pizza, with fresh pineapple, proscuitto, sliced sweet ancient peppers and red onions, with a combination of mozzarella and fontina cheese.
I do not care for Chicago-style pizza. I realize that is a heretical statement around here, but it’s true. I find deep-dish pizza to be sloppy, greasy and much too heavy, while the other kind that is popular here, which has a very crunchy thin crust and cornmeal underneath, is somehow too dry and too saucy. My perfect slice has a crust that is chewy with airy ciabatta-like edges, a moderate amount of sauce that isn’t hopped up on sugar, good quality mozzarella, and thinly sliced toppings that are cooked through. Onions that have been hacked up end up half raw even after a stint under extreme heat, as do peppers and mushrooms.
Unfortunately, all the pizza places in Hyde Park offer Chicago-style pizza (with the exception of Domino’s which D. categorically refuses to eat and I can’t blame him). That hasn’t stopped us from ordering it on occasion after a dish absolutely flopped or when we just have no energy to cook. Every time we do, I’m disappointed. Besides, neither deep-dish nor crunch-crust makes particularly good leftovers, and isn’t that the whole point of pizza? Eating the leftovers hungover or for lunch the next day?

Zucchini, sweet ancient peppers, sundried black olives and red onions with mozzarella and fontina cheese.
It was revelation when I figured out that I could make better pizza at home, myself. I don’t mean to brag about my pizza-making skills, that’s just a comment on how crappy our take-out options are around the neighborhood. I think many people are probably put off by how much work homemade pizza seems to involve, when it’s generally thought of as convenience food. But if you organize your time properly, making your own pizza can be super quick and easy.
By now, anyone who reads food blogs knows about Jim Lahey’s “no-knead” method for making pizza dough. I need not heap any more praise on it here. But trust me, it works. It just does. That recipe is the foundation of my system: I make the no-knead recipe for dough first thing in the morning before I leave the house, so it’s ready for me by 7 or 8 pm in the evening. It takes less than 5 minutes to throw together. The recipe calls for an 18 hour rise, but my kitchen is so overheated that I find it rises much quicker. I’ve tried just leaving a damp washcloth over it, but it dries out the dough too quickly that way. Cling wrap is a better bet.
Lately, I’ve been having good success with rolling out the dough, which seems to produce far fewer holes and disproportionately wide or thin areas. I form a disc of dough and roll it out on a floured surface, then I stretch it out between my hands and on the pan. I don’t have a pizza stone, I just use a Calphalon non-stick pan. I put a light spray of olive oil on just in case.
I make a fair amount of pizza sauce on occasion and freeze whatever I don’t use immediately. My sauce is pretty simple: a can of crushed tomatoes, as well as a pinch of hot red pepper flakes and oregano. I simmer it until it’s on the thicker side. Too soupy sauce leads to a wet crust, which you don’t want; you want to spread the sauce sparingly onto the dough before you load it with toppings.
You can put whatever you want on your pizza, as long as it’s not too overloaded and the toppings are thinly sliced. Use your discretion. I like to do a combination of grated mozzarella and fontina these days, or dot the pizza with creamy goat cheese. I think creamy cheeses work best with pizza, but that’s a personal preference.
Stretching out the dough, grating cheese, chopping toppings, and simmering sauce if you haven’t already made it probably takes about 20-30 minutes to pull together. 11-12 minutes in the oven at 500 degrees and you’re good to go. That’s around the same amount of time delivery seems to take.
I know I’ll never be able to produce perfect pizza in the absence of a wood burning oven (lo and behold, my rental apartment didn’t come with one) but this is better and cheaper than any of my local options. It’s damn good enough.
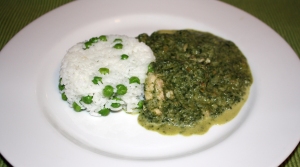
chicken saag
 I’m probably not alone in craving lighter food and vegetables after the holidays, though we skipped the roast turkey and mashed potatoes per D.’s family tradition in favor of a standing rib roast and roast potatoes. Nevertheless, we had a couple of meat and sweets laden days down in South Carolina (go figure). So when D. requested Indian food for dinner tonight, I decided that we needed a curry with greens in it. This is basically saag paneer, with chicken instead of cheese. I’ve made something similar with lamb and mustard greens in the past, which also turned out quite well. I can see this working equally well with lamb, albeit with some adjustments for cooking time. D. thought that the flavor of chicken was lost underneath the spinach, while lamb would stand out more. In any case, it was definitely tasty and it hit the right spicy, creamy, veggie notes.
chicken saag
Serves 4-6. Adapted from indiacurry.com.
- 6 boneless, skinless chicken thighs, chopped into small pieces, with any excess fat removed
- 10 ounce package of frozen spinach
- 1 large white onion
- 6 garlic cloves
- 1 2 inch piece of ginger, peeled
- 2 serrano peppers
- 1 teaspoon of ground coriander
- 1 teaspoon of ground cumin
- 1 teaspoon of garam masala
- 1/2 teaspoon of cayenne
- 2 roma tomatoes, peeled, seeded and diced
- 1 cup of chicken stock
- 1/2 cup of cream
- 2 tablespoons of butter
- salt to taste
- ghee for cooking
Cook the spinach for 3-4 minutes in boiling water, drain and puree in a food processor, then set aside. Next, puree the onion, garlic, ginger and serrano peppers in a food processor until they form a paste. Heat some ghee in the pan, and cook the chicken pieces until they are opaque but not cooked through. Drain, reserve juices in the pan and set the chicken aside. Add some more ghee, and sautee the onion, garlic, ginger, serrano combination on medium heat until the moisture is more or less gone. This should take no less than 10-15 minutes but might take more depending on how watery the paste is. Add the spices and sautee for another 2-3 minutes until the spices are fragrant. Add the tomatoes and sautee until the moisture is gone, another 10-15 minutes. Add the chicken and the stock, bring to a boil, then put on the lid and simmer on low for about 10 minutes. Then add the spinach, stir to incorporate and then let it simmer for another 10 minutes or until the chicken is cooked through. Add the cream and salt, to taste and simmer on low for another 5 minutes. Before serving, stir in the butter. Serve with rice.
Note: I brined the chicken pieces for a few hours to make them more juicy, but feel free to skip this step.
penne with sausage and fennel
 I’m not quite sure what to do with myself now that I’m back in Chicago, back to “normal life”. When I was in Moscow, there was a logical structure to my days, even if I could always self-negotiate an extra hour in my pajamas in the morning, wasting time on the internet while drinking coffee and eating vafli for breakfast. This was especially the case as it grew colder, darker and snowier. I don’t technically need to be on campus until next quarter, when I start TAing again, but I’ve spent most of this week in the Reg poking at an article I’m writing and collecting random sources for my dissertation from the basement stacks. I went to our Modern European history workshop on Wednesday, only to be received with a good natured cries of “What are you doing here already? Lay low! Get some rest!” I’m thinking about giving myself some DIY sewing projects during this “time off”. But I feel like I’m being pulled back toward my work all the time. I want to get a big chunk of dissertation writing done before the spring, when I’m lecturing two classes.
Still, a girl’s gotta eat, right? We got a brand new oven on Tuesday, which has me super excited about cooking again. The one that came with the apartment didn’t have the right burners for the stovetop: they were too big and they slid around, tipping cooking vessels over if you were not very careful and vigilant. I was terrified of sending a whole pot of boiling water onto my torso, or accidentally chucking a frying pan full of food across the kitchen as a result of aggressive stirring. The superintendent sent someone over to inspect and he agreed that it posed a real danger; however, I wasn’t expecting them to just give us a brand new digital oven. There are some advantages to living in University housing, after all.
D. is up to his ears in grading, job and post-doc applications, and general grad school insanity, and both of us have just been exhausted in the evenings. This pasta dish was a good dinner solution for those nights when you want something comforting and homemade but not too complicated. As we all know, pasta is the ultimate, easy comfort food (and anyone who disagrees is a fool). It also makes sufficient leftovers for tomorrow’s lunch.
penne with sausage and fennel
Serves 4. Recipe adapted from Blue Kitchen.
- 1/2 lb. of penne (about half a box)
- 1 bulb of fennel, sliced into 1/4 inch pieces, plus about 2 tbsp. of chopped fronts
- 2 mild Italian sausages, removed from their casings
- extra virgin olive oil for cooking
- half of a large onion or one whole small onion, small diced
- 1/4 cup of tomato paste, or more depending on how tomato-y you like it
- pinch of crushed red pepper flakes
- 2 cups of pasta cooking water (remove it after a few minutes of boiling the pasta)
- salt, to taste
Turn on burner to boil the pasta water while you prepare the sauce. Saute the onions in the olive oil on medium heat until they are beginning to caramelize (this should take no less than around 15 minutes), then add the fennel pieces and saute for another few minutes until it’s starting to caramelize around edges also. When the water comes to a boil, put the pasta in to cook; it will need around 10-13 minutes, depending on how firm you like it. When the fennel is done, add the sausage and break it up into small pieces as it’s cooking. When the sausage is no longer pink, add the tomato paste and stir to combine. When the pasta is done, drain it and add it to the onion, fennel, sausage and tomato paste concoction, then the pasta water. I would add the pasta water gradually, monitoring liquid levels, because the first time I made this, I only needed one cup. For some reason, the second time, I used both cups. When the desired liquid levels are achieved, salt to taste and stir in the fennel fronds. Serve with grated parmesan.
dark chocolate cake for dark, cold days
 This is a land of extremes, not least because of the weather. At the height of the summer it’s broad daylight at 10 pm and now, in October, we’re in the midst of a downward slide toward 4 pm sunsets and 9 am sunrises. Not that it’s much better in Chicago, to which I am headed in less than 5 weeks. But the centralized heating in my building hasn’t been turned on yet, nor has it been in the archive where I spend most of my days, meaning that I’ve spent most of the past week shivering.
There is not much else to do on dreary weekends but stay in, watch TV and movies, and indulge in poor nutrition choices. Yesterday wasn’t quite as miserable as Friday or today, in that it wasn’t raining, but it was still very windy. Nevertheless, it was a day for being cozy. Some friends and I spent the evening eating KFC spicy chicken wings (you’ll think I’m crazy but KFC is 200% better tasting here than it is anywhere else) and chocolate cake. This dark chocolate cake pictured at left. I had originally got it into my head to make a beet-based red velvet cake, but the beets I purchased turned out to be white on the inside. Just when I thought I’d come across the full color spectrum of beets – red, yellow, green – it turns out there are black beets in Russia, which look exactly like the red ones on the outside but have white radish-y interiors. They are not sweet and no good for cake at all.
I decided to make a simple dark chocolate cake instead. But that also proved to be a problem, at least temporarily. Almost all the recipes for dark chocolate cake I came across on the internet insisted on two things which seemed wrong to me: 1) using cocoa powder and 2) using vegetable oil. I had cocoa powder in the cupboard, but I remembered from a previous attempt that it did not result in a dark chocolatey taste at all. It was still good, but much lighter in color and flavor, sort of like a regular chocolate cake. Maybe this is due to the difference between Russian and American cocoa powder, I don’t know. But there was no way using the cocoa powder I had on hand was going to result in a moist texture and the characteristic bittersweet flavor of dark chocolate, which is what I was going for. Secondly, why use vegetable oil when you can use real butter, which is much better tasting? I know some people swear by vegetable oil in order to produce a moist cake, but I don’t get it. To me, it seems like baking with margarine. Blech.
The solution to the first problem was to use a whole bar of fine dark chocolate with a high cocoa percentage. I opted for 70% over 90%, which I think was the right choice, but if you wanted even more bittersweetness you could go with a higher cocoa count. The 70% is a bit sweeter than the 90%, so I cut the sugar to 1.5 cups. I also cut out the boiling water almost every recipe called for — again, why use water when you can use something that tastes much better? I opted for a 1/2 cup of coffee (well, an Americano, really, composed of 1/4 cup of strong espresso and 1/4 cup of hot water). I thought two cups of liquid (milk and water) was too much and would make the batter too soupy. Again, a good call.
This cake turned out perfect: it was moist, dark, a little bit fudgy, but still very light. I think you could take this in a different direction and replace the espresso with orange liqueur. I served it last night with a dollop of whipped cream, but it was fine without it just now as a guilty afternoon snack after another dark, cold day at the archive.
dark chocolate cake
Adapted from this recipe over at The Kitchn.
- 1 3/4 cups of all-purpose flour
- 1 1/2 cups of white sugar
- 1 1/2 teaspoons of baking power
- 1 1/2 teaspoons of baking soda
- 1 teaspoon of salt
- 2 eggs
- 1 cup of whole milk
- 1/2 cup of butter
- 3.5 oz of dark chocolate bar (a whole bar of fine chocolate, see note above)
- 1/2 cup of strong coffee OR 1/4 cup of espresso and 1/4 cup of hot water
Preheat the oven to 350 degrees (around 180 Celsius). Combine the dry ingredients in a large bowl. Add the eggs and the milk and mix with an electric mixer but don’t go overboard with it – over-mixing can make a batter too dense. In the meantime, melt the butter and chocolate together in a sauce pot on low heat, stirring frequently. Do not let it boil; chocolate can burn easily. When they have combined, remove the pot from the heat, add the coffee, and stir to mix. Blend the chocolate, butter, and coffee mix into the batter. Pour the batter into a buttered 9-inch cake pan and bake for 40-45 minutes or until a toothpick/cake tester comes out clean.
flatbread with fig jam, goat cheese, gorgonzola, proscuitto and arugula
 The countdown is on… I have exactly seven weeks left in Moscow as of today. I have mixed feelings about this: on the one hand, I’m more than ready to be back with D., who left for Chicago on Wednesday and is singlehandedly masterminding our move into the new apartment (he is the best, for so many reasons), and I definitely want my own bed back, but on the other, I really like it here and I feel like I’m making big strides in my research. I am unreservedly looking forward to rebuilding my pantry and using my various kitchen gadgets, as well as an oven that doesn’t suddenly turn off for no reason, which, of course, I only ever notice after it’s been off for over an hour and my half-cooked roast chicken is sitting inside asking: what is supposed to be happening here?
This flatbread was inspired by a pizza I ate the other night at Delicatessen here in Moscow. Some friends here volunteered to cheer me up over cocktails after Daniel flew home. Not to be smug, but I think this flatbread was better than the pizza we ate that night — which was also very good, don’t get me wrong. I’m calling this incarnation a flatbread because pizza says saucy and round to me.
Figs are in season right now and they are cheap. We’ve been eating them for weeks now. The figs we had when we were on vacation in Antalya were much better than the ones you can get in Moscow grocery stores, but these are not half bad either. I didn’t find a recipe online for fig jam that I liked or that I thought would work in this flatbread, so I just made one up myself (see below). I wanted something more tangy than cloyingly sweet. On that note, you don’t want to overdose the pizza with it, spread it out thinly (see the photograph at left).

Click to enlarge.
As for the dough, I used Jim Lahey’s no-knead pizza dough. Honestly, this was the best pizza dough I’ve ever used. The hype is well-warranted. It produced a chewy crust, which I prefer, and I had no difficulty at all stretching it out. The recipe on Serious Eats calls for 18 hours of rising, but apparently you can get away with less. Or more, as I found out: I put the dough together yesterday morning before I went to the archive and I let it rise all day in a large bowl covered with a dish cloth. At around midnight, I threw it in the refrigerator, still covered. I took it out at around 11 am today and let it return to room temperature. I used half of the batch in this flatbread (which is about 12 x 6 inches in case you were wondering) and the rest should keep for another pizza/flatbread in a few days’ time. If you were making a bigger pizza, you could probably stretch it thinner than I did. My oven here in Moscow gets all bottom heat so it didn’t brown the crust like it normally should, but this was still really satisfying and should be even better with a properly functioning oven.
The sweet/salty combination works perfectly here. I used creamy and mild gorgonzola, but I feel you could go with a more pungent blue cheese and it would work well. For the goat cheese, I used Chavroux because the goat cheese on our pizza at Delicatessen was more creamed than the chèvre that comes in log form. I think it was a good choice.
flat bread with fig jam, goat cheese, gorgonzola, proscuitto and arugula
- 1 portion of pizza dough (you can make your own or buy store bought)
- about 1/3 of a cup of fig jam (see recipe below)
- 1/4 cup of crumbled goat cheese
- 1/4 cup of gorgonzola
- 2 slices of proscuitto torn into pieces
- 1/2 cup of loosely packed arugula leaves
- chopped chives
Stretch out the pizza dough to fit the baking tray. Spread the jam onto the dough and distribute the goat cheese, gorgonzola and proscuitto evenly. Bake at the highest setting your oven has for 10 minutes. Remove from heat, top with the arugula and chives. Eat!
fig jam
- 4 figs, chopped into 1 cm bits (I used purple-skinned ones, but green would work too)
- 1/2 cup of sugar
- 1/4 teaspoon of lemon zest
- juice of half a lemon
- 1 tablespoon of honey
- pinch of cinnamon
- 1/2 cup of water
Put the ingredients in a small sauce pot and simmer, covered, on low until it’s sticky (about 30-40 minutes). That is all. This will produce more fig jam that you need for the pizza, so eat the rest on toast or a scone.
pink tomato gazpacho
 It is HOT in Moscow. Not nearly as hot as two summers ago, when forest fires were ravaging the countryside and Moscow was filled with thick black smoke, but hot nonetheless. I am on an enforced archive holiday, since the state archives have mostly closed down for their summer break, which has given me time to think about cooking again. The trouble is that the sunniest part of the day in our apartment tends to occur right around dinner time. It is blindingly bright and hot as hell in our tiny kitchen precisely between 6-8 pm. Turning on the oven during this time is downright unpleasant.
This gazpacho was an excuse to use my favorite pink tomatoes, which were on sale at our local grocery store. I’m not sure the picture does justice to their color, which is closer to fuchsia than red-orange. And, aside from quickly blanching the tomatoes to get their skins to easily slide off, it requires no cooking whatsoever. It fit the bill for a hot, muggy evening.
I don’t have a food mill here in Russia (or at home, actually), so I have an improvised method for peeling and seeding tomatoes without losing all the juice. Use a cutting board with a groove around its edges, the kind you use for cutting juicy meat, so it the tomato juices don’t spill out on to the counter. You will also need a fine mesh sieve, not a flat one but a curved one, and a bowl. After blanching the tomatoes, peel the skins and throw them into the sieve, which you’ve placed over a bowl (I have one with little hooks that lets it cling on, so it’s not constantly sliding around). Cut the tomatoes in half, not like you would if you were slicing them but through the mid section. Using a small spoon, scoop out the seeds and gooey parts (is there actually a word for this?) and put them in the sieve. Chop the seeded tomato flesh into small bits and put them in the bowl under the sieve. I also toss the harder part toward the stem into the sieve, since there is a fair amount of juice left in it. Finally, pour whatever has collected on your cutting board into the sieve. Then, use the spoon to stir and squish the rejected tomato parts’ juice through the sieve. That way, you don’t lose any of the juice, but you also don’t get all the bitter seeds and stringy center parts in your tomato pieces. I use the same method for making fresh tomato sauce for pasta.
I like my gazpacho chunky, not overly pureed. The same goes for hot soups, but especially for gazpacho. If you like your gazpacho more on the pureed side, feel free to whizz everything together and serve it that way. I gave one or two extra pulses of the food processor to the soup when it was all put together to blend, but that’s all it needs in my humble opinion.
Pink Tomato Gazpacho
Serves 2. Recipe by me.
You will need:
- 5 medium sized very ripe pink tomatoes (or any other good tomato will do)
- 2 small cucumbers (We’re in Russia where these are more common, but you could easily use a whole small English cucumber or a piece of a larger one. Use your discretion.)
- 1/3 cup of finely chopped red or yellow (or a combination of both) peppers
- 2 garlic cloves, finely minced
- 2 tsp. of white wine vinegar
- salt and pepper
- sour cream (optional)
- sliced green onions (optional)
Once you’ve prepared the tomatoes as described above, take about half of the tomatoes and their juice and set aside. Peel one of the cucumbers and add it to the tomatoes. Using a food processor attachment, process the tomatoes and cucumber until smooth. Add the reserved tomatoes back to the mix. Peel and seed the other cucumber and chop it into tiny bits, then add it to the soup, along with the chopped peppers, garlic, white wine vinegar and salt and pepper to taste. Put the soup in the fridge to chill for at least an hour. The flavors will deepen the longer you leave it in. Serve with a dollop of sour cream and the sliced green onions on top.
You can also add whatever toppings you want: crushed red pepper flakes, dill, mint or basil, roasted corn, croutons… Get creative or simply use up whatever you have on hand.
Baking in Russia

Photo by Adrianne Jacobs.
It’s time for the Procrasticooking quarterly report (as in, I’ve posted once since I came back to Moscow and April is almost over). But it’s a good one, I promise!
I’ve been baking a lot of cakes lately, which, as I’ll get to in a moment, is something of a challenge in Russia. First, there was this Chocolate Guinness Cake, recipe courtesy of Nigella Lawson, for St. Patrick’s Day. Then, for a friend’s birthday, I made a combination of a basic vanilla birthday cake from Joy of Baking with a vanilla bean buttercream that I sort of came up with on the spot, involving beating the hell out of a massive amount of unsalted butter, powdered sugar, whipping cream, vanilla bean scrapings and a pinch of salt. That would be the cake you see in the picture above. Finally, yesterday, I made this blueberry cake from Simply Recipes, and served it heated with a giant dollop of plombir, a type of generic milk-flavored ice cream that often comes in a bag here in Russia. Not that I’m discrediting the joy of plombir, because it’s essentially frozen whipped cream when it comes to its milk and fat contents, but the bag-0-ice-cream presentation often seems a little lacking.
Anyway, this post is about the difficulties of reproducing North American recipes in Russia and some tips for how to do so. Because, while Russia definitely has an enormous sweet tooth, what counts as cake here is slightly different in texture, sweetness, and density. Part of this is a problem of basic ingredients, which are also slightly different in terms of grind, quantity, and chemical composition. Even when you go to a Starbucks, which essentially reproduces North American desserts, you will often see baked goods that are flatter and denser. This isn’t a comment about taste, since I have to admit that Russian Starbucks’ caramel pecan brownie (usually just called пирожное брауни) is a small guilty pleasure for me, alongside an Americano. Of course, you could buy dinner with you’d spend on that here, since Starbucks is ridiculously expensive in Moscow.
In any case, here are the main differences you are likely to encounter trying to bake here:
- Baking powder (разрыхлитель теста): This is probably the most problematic ingredient, although it’s relatively widely available. When you go to a grocery store look for a little package with a picture of a cake on it. It never seems to come in anything other than an incredibly small 10 g package, which should cost around 10 rubles, maybe less depending on where you are shopping. It’s definitely more expensive than a container of Clabber Girl, I’ll tell you that much. The most important difference is the chemical composition of it. From the list of ingredients in the German brand Dr. Oetker’s baking powder: pyrophosphate acidic soda (or my rough translation of that), sodium bicarbonate, and corn starch. Clabber Girl seems to also contain a combination of baking soda and acid ingredients, minus the corn starch. I’m not a chemist, so I can’t speak to how the ratios of these ingredients in each form of baking powder behave differently, but as a baker, I can tell you that they just do. The baking powder you get in Europe definitely does its job, but it just doesn’t puff up baked goods the same way. I tried to obtain cream of tartar so I could make a homemade version of baking powder, but it is impossible to find here.
- All-purpose flour (пшеничная мука хлебопекарная): Yet again, I can’t tell you why it behaves differently but it just does. My suspicion is that all-purpose flour here is actually closer to what we would consider bread flour in the United States or Canada. Bread flour has higher protein in it, which creates more gluten and a chewier end product (think ciabatta). Most all-purpose flour in North America, I would wager, is intended for making desserts, not bread products and tends toward a lower protein count. I’m considering buying pastry flour here and experimenting with a mixture to see if I can’t achieve a lighter effect.
- Powdered sugar (сахарная пудра): If you’re not interesting in making icing for cakes or cupcakes, this probably doesn’t affect you. Powdered sugar also comes in these tiny sachets, sometimes in a larger 250 g bag. Icing a cake can be extremely pricy as a result. The main issue, I think, is that powdered sugar is understood as a decorative ingredient, something to sprinkle in tiny amounts on top of a cake or croissant, for example. Iced cake isn’t really a thing here, surprisingly, considering Russians love overly saccharine things (ahem, шампанское).
- Brown sugar: That one doesn’t exist here. You can get brown-ish unrefined sugar crystals here, but it isn’t the same soft, malleable brown sugar that you need for making perfect chocolate chip cookies. I’ve given up on making cookies here as a result. What we think of as brown sugar has a high molasses content. Theoretically, you could make your own with a fine grind of sugar and molasses, but I haven’t seen the latter anywhere here. It’s possible that it exists, and in that case I’ll give it a shot.
- Temperature settings on Russian ovens: If you’re lucky, you have an oven with celcius settings and you can google the equivalents for recipes in Farenheit (there are a zillion sites telling you how to adjust). However, Russian ovens often just have numbers 1-5 (Soviet ovens often have only 1-3), which isn’t helpful at all in trying to figure out what to set it at. I am not sure about this, but I would guess you can buy an internal oven thermometer to alleviate this problem, or just bake a bunch of things and see what turns out! The one problem I have with my oven is that the heat all comes from the bottom, which is terrible for roasting and means that the bottom of everything I bake is always a little crunchier or denser. It makes roasting chicken a pain, but this is not a post about roast chicken!
All this being said, you can easily bake here if you have a functional oven, and the basic ingredients are widely available, even if that means having to go to a few shops to find everything. A good place to start is Ashan. Actually, when I bought things for the birthday cake, they had a big promotional display of baking-related materials for the holiday (we have about a week and half of state holidays now). They even had chocolate chips. Go bake a cake!
 It’s been forever since I posted, I know. It’s an excuse I’ve given many times before, and I won’t justify it, aside from the obvious: I had an incredibly busy fall quarter with teaching and getting ready for my year-long trip to Russia. But here I am in Moscow! As I write this, the sun is going down (5:30 pm, ugh) over the snowy rooftops of my neighborhood in the Basmanny district of central Moscow. We have a lovely view of the city, which I’ll post another time.
I’ve resolved to rejuvenate my cooking blog by posting how I’m adapting, negotiating and, let’s be honest, sometimes failing to reproduce recipes that are in regular rotation in our kitchen at home, and things I’ve always wanted to try to make. When D. arrived this weekend, he declared that he wanted to eat smoked fish and caviar as soon as possible, so on Tuesday we made the trek to Ashan at the Gagarinskii mall (around the corner from that enormous statue of Gagarin that makes him look like Superman) to investigate our options, since Ashan is where you can find pretty much everything you are looking for in one place. As an aside, we also got venison pate (delicious on rye bread!) and extremely inexpensive lamb rump, which is going into spinach and lamb curry… I’ll report back tomorrow about that!
 I decided to start out with a recipe that, more or less, called for ingredients that we could easily procure in Russia, smoked fish being one of them. Technically, this recipe is an adaptation of a Serious Eats adaptation of Thomas Keller’s salad, but who’s keeping score?
The smoked fish aisle at Ashan is downright intimidating. We didn’t recognize half of the names of the fish… lo and behold skumbriia (скумбрия) is the word for mackerel in Russian. But I did know the word for trout: forel’ (форель). We purchased the lovely piece of it you see at right for just over 4 USD. I’ve only ever had smoked trout in the States when it’s more cooked and flaky in texture. This smoked trout was more like the texture of smoked salmon and was bright pink-red, as you can see in the middle picture.
Fingerling potatoes are not so easy to find here, but you can get baby potatoes that will do the trick and have almost the same shape and texture as fingerlings. We didn’t have any endive at our local grocery store, although I have seen it there before. I meant to throw some ruccola/chard salad greens mix in as a substitute and just forgot. I didn’t miss it, to be honest. Instead of chives and tarragon, I got one of those packs of fresh herbs that can be found in every Russian grocery store, including parsley, green onions (nezhnii luk (нежный лук) or literally, “gentle onion”), and dill. I skipped out on shallots, because I used a fair amount of green onion. Capers and gherkins should be easy to find in any standard grocery store in the pickle aisle. There is always a pickle aisle, this is Russia! I really liked the sweetness of the cornichons amid the saltiness of the capers and the smokiness of the fish.
For the dressing, you should have no difficulty finding eggs, whole grain dijon, canola oil, and lemons. The recipe makes slightly too much dressing, and I regret dumping it all in, because it soaked through the herbs. So add the dressing sparingly, to your taste. I ended up adding maybe 1/4 tsp. of sea salt to the salad, because it was plenty salty enough from cooking the potatoes in salt water, and the capers, which were especially salty.
The verdict? An interesting mix of flavors and a bright potato salad. Neither D. nor I are big fans of mayonnaise-based potato salads, and using the egg yolk here was a good way to make the dressing creamy and comforting without it turning the overall salad into mayonnaise-laden mush. I’m not sure I could eat this regularly but it was highly enjoyable.

